
All Articles
Decoding Solana data accounts
On working with Solana, I regularly need to check the contents of a transaction or an account. Usually, data reading is done through a user interface, eliminating the need for manual intervention. However, there are situations where using the UI is not possible or convenient, or when one simply wants to verify the presence of certain data manually. In this article, I will share a method I use for this purpose, and along the way, we will explore some tools that can be helpful.
|
Note
|
As a disclaimer, there are certainly other ways to accomplish this task. I would be glad to learn more, so feel free to share with me on Twitter at _chalda. |
Solana Transaction and Account Data
A brief touch on Solana transactions and accounts first (no details, there are many other resources for that).
For the purpose of this article, we say that Solana has an account with various attributes (such as owner and possession of lamports), and the account’s content is represented as raw binary data, with the structure defined by the owning program. Similarly, transactions have a specific format that dictates the accounts involved in the transaction, while the call data is encoded solely according to the owning program’s requirements.
Solana CLI to fetch data
To investigate, let’s get some data from blockchain.
Through of this article I use an example contract program called simple-admin (branch v1).
It’s a simple program allowing to create an admin account and, once created,
one can request to print a message that’s included in the transaction’s log.
The program is deployed at the devnet address sa3HiPEaDZk5JyU1CCmmRbcWnBc9U4TzHq42RWVUNQS.
We are gonna use solana account command to fetch data of accounts created with the simple-admin program.
We executed instruction CreateSimpleAccount that initialized Solana account at devnet address
DabBrrPf3JcNgKqcYNhn3tVcfPwDpsQ6HdAifNWi1ebJ.
By default, the solana account command displays the data in hexadecimal format.
However, by using the --output option, we can retrieve the data in base64 format, that we want to use here.
# DabBrrPf3JcNgKqcYNhn3tVcfPwDpsQ6HdAifNWi1ebJ is an administrative account of the simple-admin contract
solana -ud account DabBrrPf3JcNgKqcYNhn3tVcfPwDpsQ6HdAifNWi1ebJ --output json
--output json
{
  "pubkey": "DabBrrPf3JcNgKqcYNhn3tVcfPwDpsQ6HdAifNWi1ebJ",
  "account": {
    "lamports": 1224960,
    "data": [
      "pZvg+dv0TqnyG8J8NTj5iMEN0Cv0IG7X57+QlCAJzwcIXnvdhqAXFQMAAAAAAAAA",
      "base64"
    ],
    "owner": "sa3HiPEaDZk5JyU1CCmmRbcWnBc9U4TzHq42RWVUNQS",
    "executable": false,
    "rentEpoch": 0
  }
}
Similarly, we can fetch data about a transaction.
For this example, I have selected one of the transactions that interacts with the simple-admin program.
It’s a transaction containing the instruction PrintAdmin that takes a message and prints it to transaction log.
By using the solana confirm command with the -v switch, we obtain all the data from the transaction
(without the -v switch, only the transaction state confirmation is displayed).
Additionally, when we include the --output json option, the data is provided in base58 format.
# transaction of simple-admin contract calling PrintAdmin instruction
solana confirm -ud 55E5mPX87Ms55chvKdGUg2XCGrJ1Qp4Pw7ER4z4fCgSqtXQ3JhZGXP7mpohTxPEm8S87Q5PNW7x7MSqx9GDATMiF --output json -v
--output json (shortened)
{
  "confirmationStatus": "finalized",
  "transaction": {
    ...
    "message": {
      "header": {
        "numRequiredSignatures": 2,
        "numReadonlySignedAccounts": 1,
        "numReadonlyUnsignedAccounts": 1
      },
      "accountKeys": [
        "CUuLjSEx7q3AB3sRGn3sMJBsSNTmULwowMGUh6NdsxQD"
        "HJ6DPqQhAYRw8YyEuVXV8mwzzNAexxEYVC3aQutWxWn8",
        "DabBrrPf3JcNgKqcYNhn3tVcfPwDpsQ6HdAifNWi1ebJ",
        "sa3HiPEaDZk5JyU1CCmmRbcWnBc9U4TzHq42RWVUNQS"
      ],
      "recentBlockhash": "GJ8fngsibguWjKTAYWeDnqKd4P7mYntDhdEBQpUjyHM6",
      "instructions": [
        {
          "programIdIndex": 3,
          "accounts": [
            2,
            1
          ],
          "data": "7oAbCvAjeJqUZ7RpVyY51x5Sa"
        }
      ]
    }
    ...
  },
}
Converting Data to a Uint8 Array
When working with data, I find helpful to examine its content in the form of a uint8 binary data array.
In this format, bytes are represented as unsigned integers. You may recognize this format if you’ve ever printed
the content of a private key file, such as one generated using the command
solana-keygen new --silent --no-bip39-passphrase --outfile /tmp/random.keypair; cat /tmp/random.keypair.
To simplify the process of converting data, I’ve created some handy Python scripts. These scripts allow you to easily transfer data from one source to another. You can find the scripts in my gist here:
These scripts are designed to streamline the conversion process. Feel free to explore and utilize them for your own data conversion needs.
|
Note
|
When working with account data, instead of using the One way to work with this binary data in uint8 array shape is by utilizing the |
Data Interpretation
The simple-admin program is written with Anchor and we have the benefit of knowing that the data is encoded
with borsh here.
As well we know that Anchor uses first 8 bytes of the data
for the discriminator
(sha256 hash of the account’s Rust identifier).
We have the contract source code at hand.
The data structure of the
SimpleAccount
is declaratively defined in the code. We can see that it includes
a Pubkey field,
which we could know having the length of 32 bytes, and a u64 number with a length of 8 bytes.
By examining this code, we can gain insights into the structure of the data and understand the specific lengths.
pub struct SimpleAccount {
    pub admin: Pubkey,
    pub print_call_count: u64,
}
With call of solana account CLI command above we’ve got base64 formatted data. Let’s decode it to uint array
with the use of the scripts above.
solana -ud account DabBrrPf3JcNgKqcYNhn3tVcfPwDpsQ6HdAifNWi1ebJ --output json

# ... taking account data base64 string ...
frombase64.py pZvg+dv0TqnyG8J8NTj5iMEN0Cv0IG7X57+QlCAJzwcIXnvdhqAXFQMAAAAAAAAA
> [165,155,224,249,219,244,78,169,242,27,194,124,53,56,249,136,193,13,208,43,244,32,110,215,231,191,144,148,32,9,207,7,8,94,123,221,134,160,23,21,3,0,0,0,0,0,0,0]
We observe that the array comprises 48, and the remaining bytes. The initial `8 bytes represent the Anchor descriptor,
followed by 32 bytes denoting the `Pubkey8 bytes represent a numerical value.
Notably, this number is encoded as an unsigned integer (uint), with Solana utilizing Little Endian encoding.
# reading bytes at index 8 (9th byte) in length of 32 bytes
arraybyindex.sh [165,155,224,249,219,244,78,169,242,27,194,124,53,56,249,136,193,13,208,43,244,32,110,215,231,191,144,148,32,9,207,7,8,94,123,221,134,160,23,21,3,0,0,0,0,0,0,0] 8 32
# > [242,27,194,124,53,56,249,136,193,13,208,43,244,32,110,215,231,191,144,148,32,9,207,7,8,94,123,221,134,160,23,21]
# printing the 32 bytes in base58 format (Pubkey)
tobase58.py [242,27,194,124,53,56,249,136,193,13,208,43,244,32,110,215,231,191,144,148,32,9,207,7,8,94,123,221,134,160,23,21]
HJ6DPqQhAYRw8YyEuVXV8mwzzNAexxEYVC3aQutWxWn8

# reading bytes at index 40 (41st byte) in length of 8 bytes
arraybyindex.sh [165,155,224,249,219,244,78,169,242,27,194,124,53,56,249,136,193,13,208,43,244,32,110,215,231,191,144,148,32,9,207,7,8,94,123,221,134,160,23,21,3,0,0,0,0,0,0,0] 40 8
# > [3,0,0,0,0,0,0,0]
# printing the 8 bytes as integer
toout.py [3,0,0,0,0,0,0,0] int
# > 3
Up until this point, we have overlooked the initial 8 bytes, which serve as the Anchor discriminator ([165, 155, 224, 249, 219, 244, 78, 169]).
This value, a hash of the account name, can be regarded as internal Anchor details. However, if we wish to verify that we are operating with the correct account, as Anchor utilizes the discriminator to confirm the integrity of the loaded data, we can obtain an expanded version of the sources by utilizing the anchor expand CLI command
when we have access to the source code.
git clone https://github.com/ochaloup/simple-admin.git -b v1
cd simple-admin

anchor expand
# ...
# > Expanded simple-admin into file .anchor/expanded-macros/simple-admin/simple-admin-0.1.0.rs

cat .anchor/expanded-macros/simple-admin/simple-admin-0.1.0.rs | grep -i Discriminator
# ...
# > impl anchor_lang::Discriminator for SimpleAccount {
# >     const DISCRIMINATOR: [u8; 8] = [165, 155, 224, 249, 219, 244, 78, 169];
Transaction data structure
For the transaction output of the solana confirm command we can read quite a good context
from the logMessages that often shows the Instruction name and informs what happens.
But let’s take a look only on the base info and the call data here.
We can see there is used one instruction and we can check more about accounts as well.
When examining the transaction output of the solana confirm command, we can extract valuable information from the logMessages.
The log messages often provide insightful details, such as the Instruction name
However, for our current purpose, let’s focus solely on call data.
We can observe that a single instruction was utilized, and we can delve deeper into the involved accounts.
|
Note
|
to learn about the transaction format I recommend deep dive article Solana transactions in depth |
solana confirm -ud 55E5mPX87Ms55chvKdGUg2XCGrJ1Qp4Pw7ER4z4fCgSqtXQ3JhZGXP7mpohTxPEm8S87Q5PNW7x7MSqx9GDATMiF --output json -v

# > ...
# >      "accountKeys": [
# >        "CUuLjSEx7q3AB3sRGn3sMJBsSNTmULwowMGUh6NdsxQD"
# >        "HJ6DPqQhAYRw8YyEuVXV8mwzzNAexxEYVC3aQutWxWn8",
# >        "DabBrrPf3JcNgKqcYNhn3tVcfPwDpsQ6HdAifNWi1ebJ",
# >        "sa3HiPEaDZk5JyU1CCmmRbcWnBc9U4TzHq42RWVUNQS"
# >      ],
# >      "instructions": [
# >        {
# >          "programIdIndex": 3,
# >          "accounts": [
# >            2,
# >            1
# >          ],
# >          "data": "7oAbCvAjeJqUZ7RpVyY51x5Sa"
# >        }
# >      ]
# > ...
Let’s examine the data in the same format of uint8 array as we did for an account above.
frombase58.py 7oAbCvAjeJqUZ7RpVyY51x5Sa
# > [163,217,65,81,53,230,29,28,6,0,0,0,104,101,108,108,111,51]
We are aware that the Anchor program employs the first 8 bytes as a discriminator,
indicated here as [163, 217, 65, 81, 53, 230, 29, 28].
Unlike Ethereum, Solana follows a single entrypoint approach for programs. In this paradigm, the program itself assumes the responsibility of determining which operation or function should be executed.
This is where the discriminator plays a crucial role. These 8 bytes serve as a defining factor,
allowing the deployed program to select the appropriate function for execution.
The Anchor discriminator is calculated as a hash from the source from the
name of the operation
/function.
As we have the source code of the program we can use again
the anchor expand command to find out that the operation
that will be executed.
cd simple-admin
vim .anchor/expanded-macros/simple-admin/simple-admin-*.rs

impl anchor_lang::Discriminator for PrintAdmin {
    const DISCRIMINATOR: [u8; 8] = [163, 217, 65, 81, 53, 230, 29, 28];
}
Now, let’s examine the accounts that are involved. From the output of the solana confirm call it appears that the account at index 3 is used as the program address,
while accounts at indexes 2 and 1, in that particular order, are considered as instruction input accounts.
From inspecting the accountKeys the keys are indexed starting from 0.
It’s worth noting that the public key at index 0 is responsible for paying the transaction fee, i.e., it’s the feePayer.
By examining the values, we can determine that sa3HiPEaDZk5JyU1CCmmRbcWnBc9U4TzHq42RWVUNQS
corresponds to the program ID, and the two accounts provided are
DabBrrPf3JcNgKqcYNhn3tVcfPwDpsQ6HdAifNWi1ebJ and HJ6DPqQhAYRw8YyEuVXV8mwzzNAexxEYVC3aQutWxWn8, listed in that order.
With the code at hand we can examine the PrintAdmin instruction
source code.
pub struct PrintAdmin<'info> {
    pub simple_admin_account: Account<'info, SimpleAccount>,
    pub admin: Signer<'info>,
}

pub fn process(&mut self, PrintAdminParams { message }: PrintAdminParams) -> Result<()> {
  // ...
}
We can read that the first account address passed in the instruction, the DabBrrPf3JcNgKqcYNhn3tVcfPwDpsQ6HdAifNWi1ebJ, is used as storage data account (pub simple_admin_account: Account<'info, SimpleAccount>).
The second account address HJ6DPqQhAYRw8YyEuVXV8mwzzNAexxEYVC3aQutWxWn8
is the admin wallet address and we recognize that this key has to sign the transaction.
Only when the transaction is signed by this key the processing is allowed (` pub admin: Signer<'info>`).
Now what about the call data? We already know that the first 8 bytes is the discriminator of the operation.
The rest is a message
PrintAdminParams#message.
The message is a string. As it’s Solana Rust We know it will be the UTF-8 string.
In assistance of the python scripts we can get the message in a readable form.
solana confirm -ud 55E5mPX87Ms55chvKdGUg2XCGrJ1Qp4Pw7ER4z4fCgSqtXQ3JhZGXP7mpohTxPEm8S87Q5PNW7x7MSqx9GDATMiF --output json -v

# ... call data ...
frombase58.py 7oAbCvAjeJqUZ7RpVyY51x5Sa
# > [163,217,65,81,53,230,29,28,6,0,0,0,104,101,108,108,111,51]

# getting all data from index 8 to the end of the list
arraybyindex.sh [163,217,65,81,53,230,29,28,6,0,0,0,104,101,108,108,111,51] 8
# > [6,0,0,0,104,101,108,108,111,51]

toout.py [6,0,0,0,104,101,108,108,111,51] string
# > hello3
And we can see that the transaction log should contain the message hello3 (i.e., msg!(…) Solana Rust macro).
Let’s confirm it in the transaction listing.
# get info about the examined transaction
solana confirm -ud 55E5mPX87Ms55chvKdGUg2XCGrJ1Qp4Pw7ER4z4fCgSqtXQ3JhZGXP7mpohTxPEm8S87Q5PNW7x7MSqx9GDATMiF --output json -v

# > ...
# > "logMessages": [
# >   "Program sa3HiPEaDZk5JyU1CCmmRbcWnBc9U4TzHq42RWVUNQS invoke [1]",
# >   "Program log: Instruction: PrintAdmin",
# >   "Program log: hello3",
# >   "Program data: 4nBLdtV6DJ/yG8J8NTj5iMEN0Cv0IG7X57+QlCAJzwcIXnvdhqAXFQYAAABoZWxsbzM=",
# >   "Program sa3HiPEaDZk5JyU1CCmmRbcWnBc9U4TzHq42RWVUNQS consumed 4266 of 200000 compute units",
# >   "Program sa3HiPEaDZk5JyU1CCmmRbcWnBc9U4TzHq42RWVUNQS success"
# > ],
# > ...|
Note
|
We previously mentioned that we have access to the source code. But how to know
where the code can be found at? This is why it’s considered good practice to include the
security-txt metadata within your program.
By publishing it,
you can enhance the security and transparency of your program.
Once the metadata is published, you can conveniently locate your program using
the Solana Explorer.
This makes it easier to access and review the relevant information.
|
Data interpretation: Looking at non-Anchor program accounts
Since there are no strict guidelines for data formatting within Solana accounts, the Borsh encoding is not the only option available. Another commonly used strategy for encoding binary data in Solana accounts is through the use of bincode. Bincode is frequently utilized within the Solana program library. A good example of this can be seen in the SPL Token program.
To further illustrate, let’s perform a quick check. We will create a new mint and mint a token to the ATA wallet address that we will examine.
# creating a new mint of the token (-ud signifies we work on devnet)
spl-token -ud create-token --decimals 0
# > Creating token FqQXsU826gjPFXkgYXpVyuaDkgVbmvULz2MktNm1p7n6 under program TokenkegQfeZyiNwAJbNbGKPFXCWuBvf9Ss623VQ5DA
# > Address:  FqQXsU826gjPFXkgYXpVyuaDkgVbmvULz2MktNm1p7n6
# > Decimals:  0

# creating token ATA account of the Solana localhost wallet (by default ~/.config/solana/id.json)
spl-token -ud create-account FqQXsU826gjPFXkgYXpVyuaDkgVbmvULz2MktNm1p7n6

# mint 100 tokens to wallet ATA address
spl-token -ud mint FqQXsU826gjPFXkgYXpVyuaDkgVbmvULz2MktNm1p7n6 100
# > Minting 100 tokens
# >   Token: FqQXsU826gjPFXkgYXpVyuaDkgVbmvULz2MktNm1p7n6
# >   Recipient: JCX5iiNKRhkSVsqjspSgJxT5KmJ7Pqfoqr2Gt5snz8sP

solana account -ud JCX5iiNKRhkSVsqjspSgJxT5KmJ7Pqfoqr2Gt5snz8sP --output json
# > Output below:
{
"pubkey": "JCX5iiNKRhkSVsqjspSgJxT5KmJ7Pqfoqr2Gt5snz8sP",
"account": {
"lamports": 2039280,
"data": [
"3GoaknTR+oDWqFG297b0/v2Vu8SDp7+L82vTdUdUB6eqlmtWff4bdZUd8oayhnUR5sMO/i+gRTg93gti4R0UbmQAAAAAAAAAAAAAAAAAAAAAAAAAAAAAAAAAAAAAAAAAAAAAAAAAAAAAAAAAAQAAAAAAAAAAAAAAAAAAAAAAAAAAAAAAAAAAAAAAAAAAAAAAAAAAAAAAAAAAAAAAAAAAAAAAAAAA",
"base64"
],
"owner": "TokenkegQfeZyiNwAJbNbGKPFXCWuBvf9Ss623VQ5DA",
"executable": false,
"rentEpoch": 0
}
}Now we can convert data to format of the uint array and check if the data length,
(that should be 165),
matches.
ARR=`frombase64.py '3GoaknTR+oDWqFG297b0/v2Vu8SDp7+L82vTdUdUB6eqlmtWff4bdZUd8oayhnUR5sMO/i+gRTg93gti4R0UbmQAAAAAAAAAAAAAAAAAAAAAAAAAAAAAAAAAAAAAAAAAAAAAAAAAAAAAAAAAAQAAAAAAAAAAAAAAAAAAAAAAAAAAAAAAAAAAAAAAAAAAAAAAAAAAAAAAAAAAAAAAAAAAAAAAAAAA'`
echo $ARR
# > [220,106,26,146,116,209,250,128,214,168,81,182,247,182,244,254,253,149,187,196,131,167,191,139,243,107,211,117,71,84,7,167,170,150,107,86,125,254,27,117,149,29,242,134,178,134,117,17,230,195,14,254,47,160,69,56,61,222,11,98,225,29,20,110,100,0,0,0,0,0,0,0,0,0,0,0,0,0,0,0,0,0,0,0,0,0,0,0,0,0,0,0,0,0,0,0,0,0,0,0,0,0,0,0,0,0,0,0,1,0,0,0,0,0,0,0,0,0,0,0,0,0,0,0,0,0,0,0,0,0,0,0,0,0,0,0,0,0,0,0,0,0,0,0,0,0,0,0,0,0,0,0,0,0,0,0,0,0,0,0,0,0,0,0,0]

echo "$ARR" | sed 's/[^,]//g' | wc -c
# > 165
Token program does not use any discriminator for checking the account type and we can see that the first chunk of the data belongs to public key of the mint and the owner of the token.
arraybyindex.sh $ARR 0 32
# > [220,106,26,146,116,209,250,128,214,168,81,182,247,182,244,254,253,149,187,196,131,167,191,139,243,107,211,117,71,84,7,167]
tobase58.py '[220,106,26,146,116,209,250,128,214,168,81,182,247,182,244,254,253,149,187,196,131,167,191,139,243,107,211,117,71,84,7,167]'
# > FqQXsU826gjPFXkgYXpVyuaDkgVbmvULz2MktNm1p7n6
arraybyindex.sh $ARR 32 32
# > [170,150,107,86,125,254,27,117,149,29,242,134,178,134,117,17,230,195,14,254,47,160,69,56,61,222,11,98,225,29,20,110]
tobase58.py '[170,150,107,86,125,254,27,117,149,29,242,134,178,134,117,17,230,195,14,254,47,160,69,56,61,222,11,98,225,29,20,110]'
# > CUuLjSEx7q3AB3sRGn3sMJBsSNTmULwowMGUh6NdsxQ|
Note
|
Native Solana programs often use bincode library (within serde) to get the data coded.
The borsh and bincode base64 data formats are not fully compatible but they could be transferred.
Recently I started a discussion at Anchor project
where the maintainer acheroncrypto managed the coding
from bincode to borsh base64 format.
|
Changing accounts for tests
One of the purposes to change the account data could be loading accounts for tests. One may want to start the solana test validator at localhost and process actions that are not possible at mainnet for testing purposes. Let’s say we want to mint a MNDE token that was minted with max amount and there is no more mint authority. We can load the account from the mainnet, change the data interpretation and then pass the changed account at the test validator start-up.
# loading account data from mainnet
solana account -um MNDEFzGvMt87ueuHvVU9VcTqsAP5b3fTGPsHuuPA5ey --output json --output-file ./mnde-mint.json
{
  "pubkey": "MNDEFzGvMt87ueuHvVU9VcTqsAP5b3fTGPsHuuPA5ey",
  "account": {
    "lamports": 1991461600,
    "data": [
      "AAAAAAU7Cq81B+5iPAIrQjwKE7gsOycDnU85ZkE/v2q2Xh0rrPJWkUi24A0JAQAAAAAAAAAAAAAAAAAAAAAAAAAAAAAAAAAAAAAAAAAAAAAAAA==",
      "base64"
    ],
    "owner": "TokenkegQfeZyiNwAJbNbGKPFXCWuBvf9Ss623VQ5DA",
    "executable": false,
    "rentEpoch": 361,
    "space": 82
  }
}
Wrote account to ./mnde-mint.json|
Note
|
We can do the process in opposite way. Generate a different mint account with parameters we need and then only change the pubkey
as we need. This is a showcase of changing an authority field that can be used for arbitrary program.
Some accounts have difficult ways to simulate current state than just in case of mint one.
|
We are interested in data of that account. The interpretation of the data can be read from the source code or this Sec3 article Understanding SPL Token Mint.
frombase64.py 'AAAAAAU7Cq81B+5iPAIrQjwKE7gsOycDnU85ZkE/v2q2Xh0rrPJWkUi24A0JAQAAAAAAAAAAAAAAAAAAAAAAAAAAAAAAAAAAAAAAAAAAAAAAAA=='
[0,0,0,0,5,59,10,175,53,7,238,98,60,2,43,66,60,10,19,184,44,59,39,3,157,79,57,102,65,63,191,106,182,94,29,43,172,242,86,145,72,182,224,13,9,1,0,0,0,0,0,0,0,0,0,0,0,0,0,0,0,0,0,0,0,0,0,0,0,0,0,0,0,0,0,0,0,0,0,0,0,0]
We can see the account first bytes belongs to the mint authority mint_authority: COption<Pubkey>
which is the part we want to change. The COption is
coded as 4 bytes
where [1,0,0,0] means to be setup and then following 32 bytes of Publickey.
So let’s get it all together and load the solana-test-validator.
solana-keygen new --no-bip39-passphrase -o ./mnde-mint-authority.keypair
solana-keygen pubkey ./mnde-mint-authority.keypair
> 9q3UhZFX5jAFZfn16Z3bsy8PedHwJVGHhd33CatVkcsN

frombase58.py 9q3UhZFX5jAFZfn16Z3bsy8PedHwJVGHhd33CatVkcsN
> [131,44,44,247,56,178,214,183,144,210,96,63,240,40,135,179,251,160,128,101,14,63,1,5,151,61,4,190,76,95,32,109]

# we know we want 4 bytes + 32 bytes to get off
arraybyindex.sh [0,0,0,0,5,59,10,175,53,7,238,98,60,2,43,66,60,10,19,184,44,59,39,3,157,79,57,102,65,63,191,106,182,94,29,43,172,242,86,145,72,182,224,13,9,1,0,0,0,0,0,0,0,0,0,0,0,0,0,0,0,0,0,0,0,0,0,0,0,0,0,0,0,0,0,0,0,0,0,0,0,0] 36
> [172,242,86,145,72,182,224,13,9,1,0,0,0,0,0,0,0,0,0,0,0,0,0,0,0,0,0,0,0,0,0,0,0,0,0,0,0,0,0,0,0,0,0,0,0,0]

# merging all together [1,0,0,0] + [mint pubkey] + [rest]
tobase64.py tobase64.py [1,0,0,0,131,44,44,247,56,178,214,183,144,210,96,63,240,40,135,179,251,160,128,101,14,63,1,5,151,61,4,190,76,95,32,109,172,242,86,145,72,182,224,13,9,1,0,0,0,0,0,0,0,0,0,0,0,0,0,0,0,0,0,0,0,0,0,0,0,0,0,0,0,0,0,0,0,0,0,0,0,0]
> AQAAAIMsLPc4sta3kNJgP/Aoh7P7oIBlDj8BBZc9BL5MXyBtrPJWkUi24A0JAQAAAAAAAAAAAAAAAAAAAAAAAAAAAAAAAAAAAAAAAAAAAAAAAA==

# change ./mnde-mint.json "data" field
vim ./mnde-mint.json
> ...

solana-test-validator --reset --ledger /tmp/test-ledger --account MNDEFzGvMt87ueuHvVU9VcTqsAP5b3fTGPsHuuPA5ey ./mnde-mint.json

# test to mint (in different console)
spl-token -ul create-account  MNDEFzGvMt87ueuHvVU9VcTqsAP5b3fTGPsHuuPA5ey
> Creating account HDBG6v77dUiNS9yjPKRaRJhDRLzhpL54aBK5PZFUAhXj
spl-token -ul mint --mint-authority ./mnde-mint-authority.keypair  MNDEFzGvMt87ueuHvVU9VcTqsAP5b3fTGPsHuuPA5ey 1000 HDBG6v77dUiNS9yjPKRaRJhDRLzhpL54aBK5PZFUAhXj
Minting 1000 tokens
RPC call getProgramAccounts
In the case of our test program, "SimpleAdmin," let’s search for all admin accounts (SimpleAccount) that have been executed three times. To achieve this, we need to search for Solana accounts that are owned by the "simple-admin" program deployed at devnet at sa3HiPEaDZk5JyU1CCmmRbcWnBc9U4TzHq42RWVUNQS where it has got data of
print_call_count field equal to 3.
To accomplish this, we will make a call to the devnet RPC server (assuming we have already created an account instance there). For this example, we only need to determine the number of accounts that meet the criteria (print_call_count equal to 3). We do not need to download the entire program data. Hence, we set the dataSize parameter to 0.
Based on the provided filter criteria, we know that the data for each "SimpleAccount" consists of 8 bytes for the Anchor discriminator, followed by 32 bytes for the public key, and finally 8 bytes for the counter we want to match. The offset value we use is 40 (calculated as 8 + 32). To specify the data to match, we pass the base58 format of the byte array [3,0,0,0,0,0,0,0] (u64), which is represented as W723RTUpoZ.
tobase58.py '[3,0,0,0,0,0,0,0]'
# > W723RTUpoZ

curl https://api.devnet.solana.com -X POST -H "Content-Type: application/json" -d '
  {
    "jsonrpc": "2.0",
    "id": 1,
    "method": "getProgramAccounts",
    "params": [
      "sa3HiPEaDZk5JyU1CCmmRbcWnBc9U4TzHq42RWVUNQS",
      {
        "encoding": "base64",
        "dataSlice": {
          "offset": 0,
          "length": 0
        },
        "filters": [
          {
            "memcmp": {
              "offset": 40,
              "bytes": "W723RTUpoZ",
              "encoding": "base58"
            }
          }
        ]
      }
    ]
  }
'
# > {"jsonrpc":"2.0","result":[{"account":{"data":["","base64"],"executable":false,"lamports":1224960,"owner":"sa3HiPEaDZk5JyU1CCmmRbcWnBc9U4TzHq42RWVUNQS","rentEpoch":0},"pubkey":"DabBrrPf3JcNgKqcYNhn3tVcfPwDpsQ6HdAifNWi1ebJ"}],"id":1}
You can check another example of setting up the filters of the the Solana RPC HTTP call getProgramAccounts at my response at the Solana Stack Exchange about bpf_loader_upgradeable data structures.
Tooling
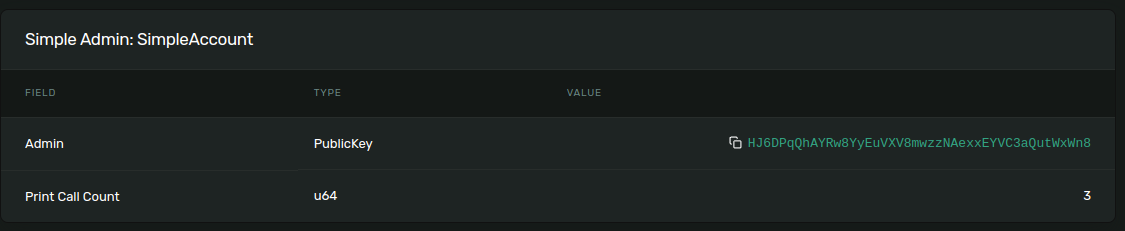
Borsh account decoding
We talked about a potential way how to examine manually binary data structure of the Solana accounts and transactions call data. Despite it’s handy to check the account this way in general it’s tedious and unproductive. Toolings around Solana makes this just easier.
When we talk about the borsh formatted accounts (which are mostly those written in Anchor)
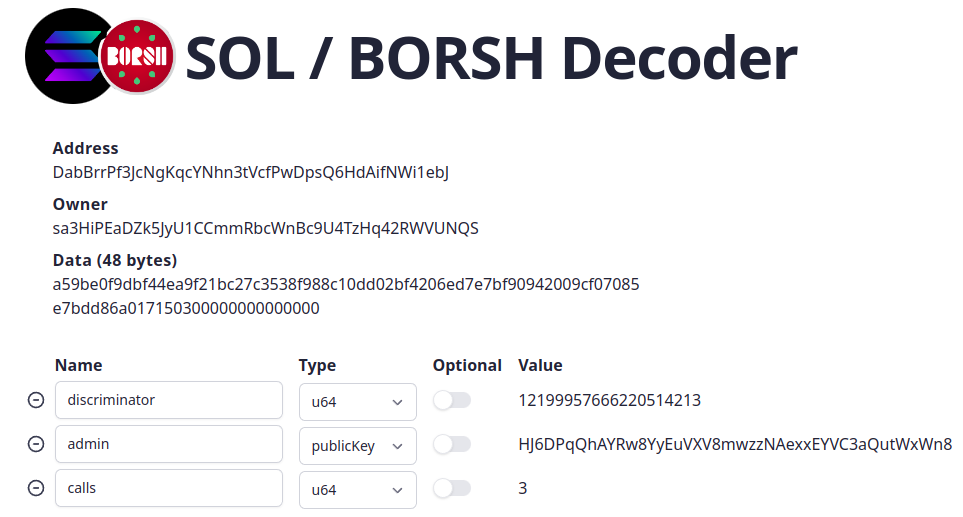
there is a site https://borsh.m2.xyz to help.
It helps to decode the account when we understand its structure.
Similar as we did above manually with python/bash scripts we can just click through
this web. Here is example for examined
DabBrrPf3JcNgKqcYNhn3tVcfPwDpsQ6HdAifNWi1ebJ account.
We fill-in the field types and size and offset is calculated for us.
UI for transactions
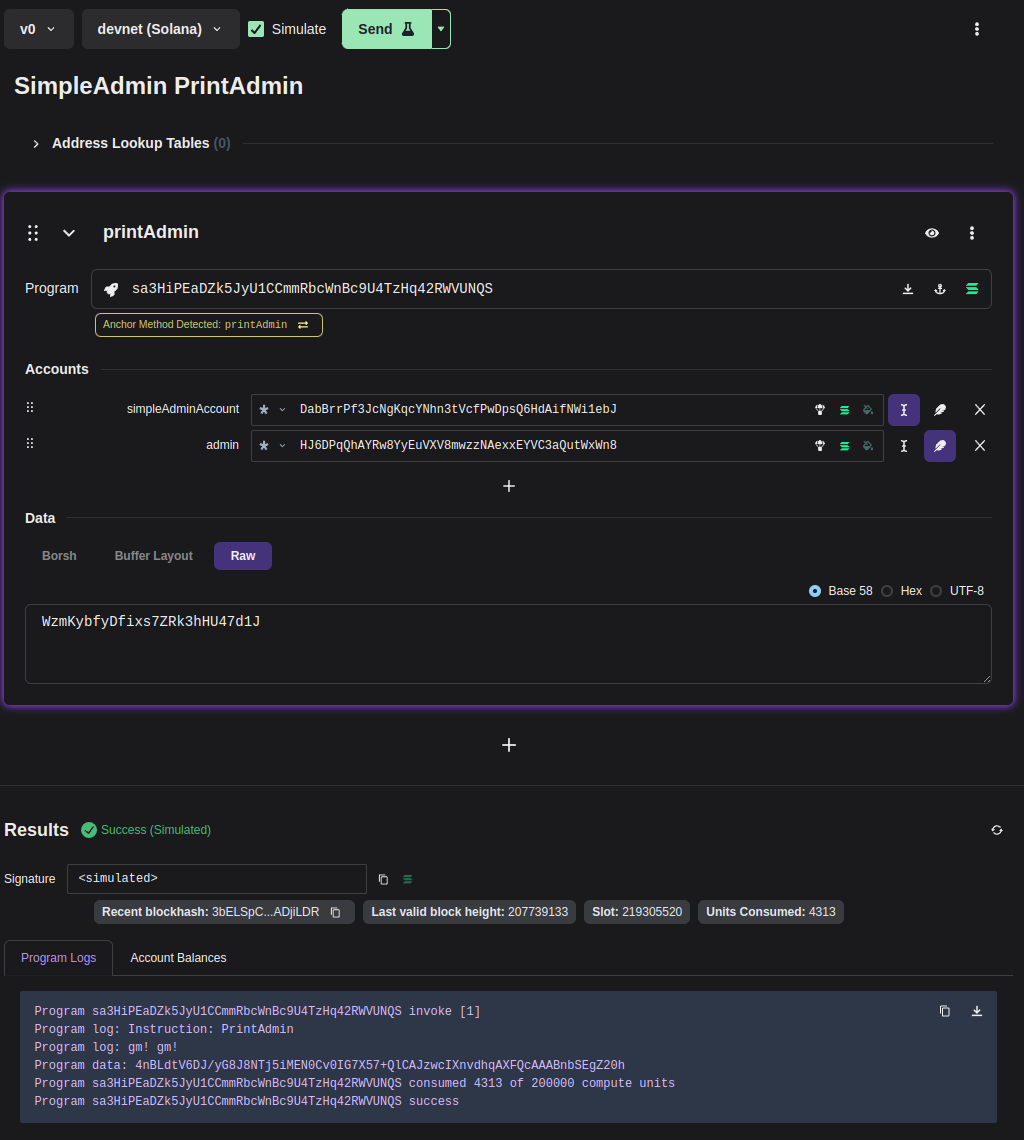
A user-friendly tool for constructing transactions can be found at https://bettercallsol.dev/. This tool allows you to easily create transactions by interacting with various parameters through a graphical interface. Once you have defined the transaction, you have the option to run it, simulate it, or pass it to integrated systems for further processing. For more detailed information, you can refer to the blog post titled Solana Transactions with Better Call Sol.
In the context of this article, I attempted to define a transaction for the "Simple Admin" contract, specifically for the "PrintAdmin" operation. You can view the form and its parameters in the accompanying screenshot.
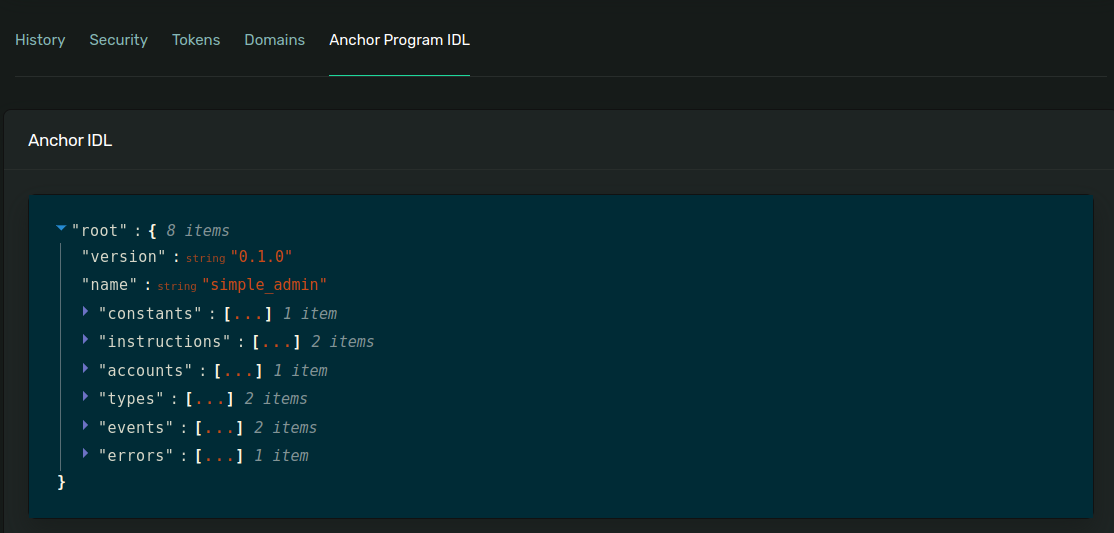
Anchor IDL
The most versatile approach is to have an IDL definition that can be interpreted by tooling, providing us with a dynamic understanding of the underlying binary structure. This allows us to gain insights into account names and interpret transactions and accounts within blockchain explorers. The aforementioned UI tool also utilizes IDL to offer information about account names.
When developing a program using the Anchor framework, the IDL is automatically generated. However, for non-Anchor programs, the Solita framework provided by the Metaplex Foundation can be utilized. There is an ongoing discussion about establishing a standardized way for IDL in Solana on the Solana forum.
For the benefit of Anchor IDL data interpretation, the program
has to be published with IDL on chain.
When one does it it can be seen in https://explorer.solana.com/ down in the box Anchor Program IDL.
For our examined Simple Admin contract the IDL
can be seen in the Explorer and the Typescript format is published next to the contract
at GitHub.
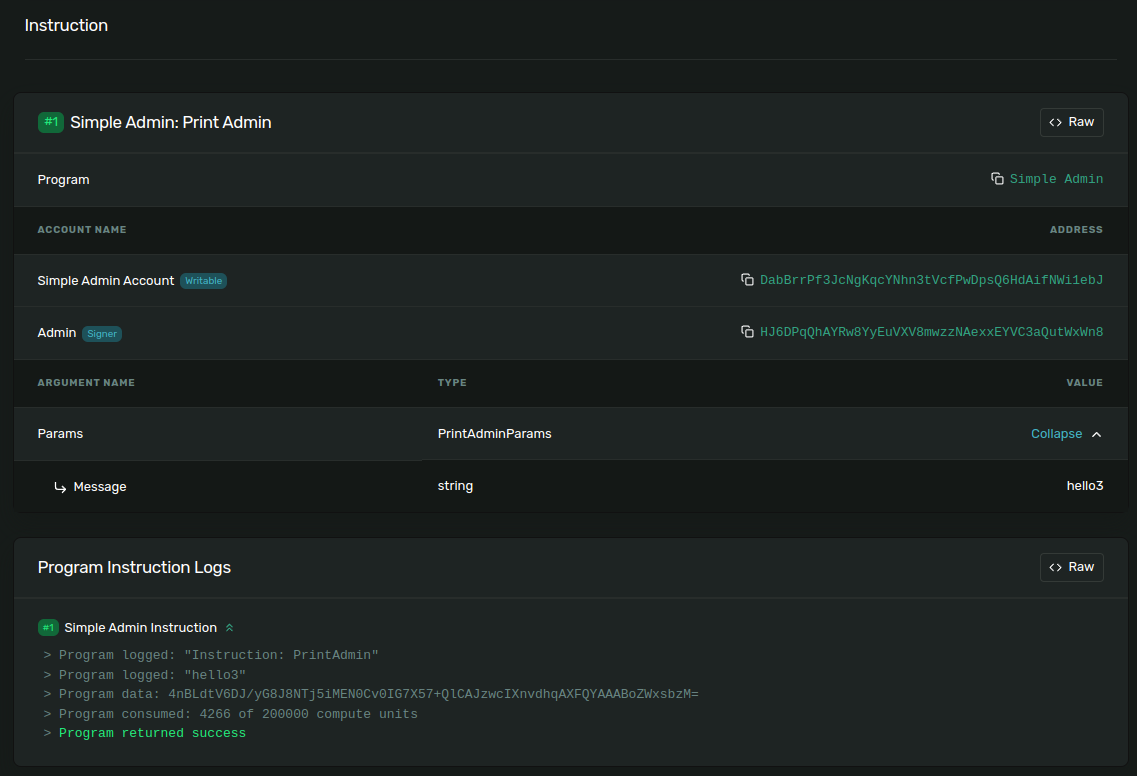
The Explorer makes it easy to access transaction details in a human-readable format.
For example, you can observe the transaction with the id 55E5mPX87Ms55chvKdGUg2XCGrJ1Qp4Pw7ER4z4fCgSqtXQ3JhZGXP7mpohTxPEm8S87Q5PNW7x7MSqx9GDATMiF or the
SimpleAccount DabBrrPf3JcNgKqcYNhn3tVcfPwDpsQ6HdAifNWi1ebJ.
Other Solana blockchain inspectors knows to interpret IDL data in the similar way. You can see the similar at Solana.fm for example.
Conclusion
We discussed one way how to manually examine the Solana data structures in binary format. For that purpose we used Python and Bash scripts. We also discussed the tooling that can help us.